Welcome to 2022!
So, this is the plan. During the last year I've been rethinking how I do projects. You know, start something wonderful, get tired of it, shove it in a box and start a new project. Nope, that process is over with. I'm being overrun by UFOs!
This is not my New Year's Resolution, I don't do those. This just happens to be the timing. Like I said, I've been rolling this over in my mind for the last year. And I actually started doing this last week and so far I have one completed quilt and one quilt top complete. More on that later.
The other thing I want to cover is tips for sewing when your eyesight is no longer what it was! My eyesight has changed quite a bit, I have a difficult time threading the needle, and my needle threader doesn't do its job. So, I created my own! It's also hard to tell darker fabrics from each other, so I figured out a way to deal with that.
Eyesight Sewing Tip #1:
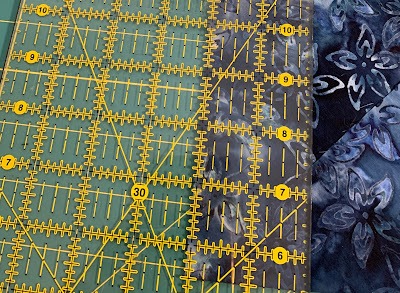
I was having a hard time seeing the dark blue fabric on my green mat. Add the ruler and all the yellow lines and the reflection of a light (to help me see better!) and I wasn't at all sure what I was cutting. So ...
I used a piece of paper out of the printer, and put it under the dark blue fabric and then it was easy to cut my fabric. At first I used up a whole piece of paper, cutting it into strips as well! But then ...
I realized I didn't need any paper under the place I cut, I only needed paper on the edge, where I positioned my ruler. Then I just used the same strip over and over.
Eyesight Sewing Tip #2:
I put a light-colored star on a light-colored background. I don't know why, but it's ironed on there and I'm not taking it off. So, I wanted a good, solid, black outline stitch around the star (to make it show up.) Under the presser foot, I had a hard time seeing where to sew. Solution? Break out the Frixion pen! I just drew a line along the star, and then I could follow the darker pen line to sew the appliqué stitch around the star!
Measuring Sewing Tip:
I was making some linen napkins, and needed a 1" hem ironed in. Four napkins, all sides needed a 1" hem ... that's 16 sides! With that little ruler that has the slider and pins and etc. No thank you!
I used a my black Sharpie and drew three lines on the light fabric.
Now, I can measure my napkin hem this way.
Line up the edge of the napkin with the top line and fold it down on the middle line. I really didn't need the third line, but it's there anyway. This was much faster.
Finished Quilts:
This is my first chenille quilt and it was pretty fun. I don't think I'll make a lot of them, but I can see myself making more. Maybe next Christmas.
There's that star I was talking about earlier! Close-up next.
The centered snowflake was complete serendipity!
And since my sister designed this fabric, I added her name from the selvedge. :) I think this border just makes the quilt.


Comments
Post a Comment